
Automate Android and iOS Device Interactions with a Corellium Linux Server
Corellium 7.10 introduces Generic Linux Virtual Machines (VMs) that can run inside the same isolated Corellium project as your virtual Android and iOS devices.
For Android Appium automation, that matters for one practical reason: that Appium server, test script, and Android device can live next to each other in the same project network. That removes a lot of the usual setup friction around local SDK installs, VPN access, firewall expectations, and one-off demo environments.
This post walks through a repeatable Android example: run Appium on a Corellium Linux VM, connect it to a virtual Android device or ADB, and automate interactions with the Corellium Café sample app.
Why Run Appium from a Corellium Linux VM?
Appium is commonly run from a developer workstation, CI runner, container, or shared enterprise compute environment. Those options work, but they often introduce operational friction that has nothing to do with the mobile test itself.
Running Appium from a Generic Linux VM inside the same Corellium project can help when your blocker environment setup, network access, or repeatability.
This approach is not always the right answer. If your team already has stable Appium infrastructure in CI, and network access to Corellium devices is already solved, keep using it. The Linux VM pattern is most useful when the hard part is standing up a clean, repeatable automation environment close to the device.
About Appium
Appium is an open-source test automation framework used for automating mobile applications on iOS and Android. It uses the Selenium WebDriver protocol to interact with mobile devices, allowing developers and testers to write tests that can run on mobile devices.
Similar to automation on the web, Appium uses selectors to identify elements in the UI hierarchy of the mobile app. Appium supports a variety of selector strategies, including ID, Accessibility ID, XPath, Class Name, and more.
Testing Across iOS and Android Applications
Appium supports both iOS and Android platforms, allowing users to write tests that can run on both types of devices. The cross-platform nature of Appium pairs well with Corellium’s ability to virtualize both iOS and Android devices.
Write Scripts in Many Programming Languages
Appium includes drivers for many programming languages, including Python, Java, Ruby, .NET, WebdriverIO, Robot Framework, and more. This allows users to write their Appium scripts in the language their team is most comfortable using.
Requirement to Run a Server
Appium requires a server process running on a machine that has network access to the Android device via ADB. Client scripts then connect to the Appium server to send commands to the device and receive responses.
This requirement has traditionally meant that users need to find a way to run the Appium server. Options include: – running the server and dependencies directly on a local machine you control – using a Dockerized Appium instance – leveraging enterprise compute resources including physical, virtual, and cloud-based machines.
Each of these solutions can be cumbersome and time-consuming. The new Generic Linux VMs on Corellium provide an alternative with a number of benefits.
Benefits of Corellium Generic Linux VMs for Appium Automations
Corellium users have a number of reasons to run Linux VMs.
Speed Up Proof-of-Concept Tests
Save time on demonstrations like Appium that require a server to control the device. You’ll be ready to go as soon as your virtual devices are booted up and dependencies are installed on the server.
Simplify the Networking and Data Flow
Each Corellium project is segregated into its own network. With the mobile device and Linux server in the same project, the devices can already communicate directly. Users can start working without the need to connect to a Corellium project VPN or tunnel data through our SSH proxy server.
Sidestep Enterprise IT Firewall Changes
For enterprise users, strict network and firewall policies can delay or complicate the setup of new tools and services. By running Linux, iPhone, and Android devices within the same Corellium project network, you can avoid the need for IT to make potentially time-consuming firewall or network changes, speeding up onboarding and reducing dependency on external approvals.
Reduce Reliance on Your Local Environment
A Generic Linux VM can run the Appium server interactions script from inside the Corellium platform. No need to install dependencies or run a Dockerized Appium server on your local environment. You can run the Appium client script from the Linux VM as well, enabling you to keep your local environment clean.
Reduce Reliance on Other Enterprise Compute Resources
For users who don’t have access to a local machine that can run Appium or who want to offload the compute resources required for testing, the new Linux VM provides a convenient alternative. By running the Appium server and client script on the Linux VM, users can leverage Corellium’s infrastructure to perform their mobile app testing without needing to find physical, virtual, or cloud-based machines to run the Appium server and interactions scripts.
Control Your Android App from Appium Running on a Linux VM
We will perform the following steps:
- Create virtual Android and Linux devices
- Install the Corellium Cafe mobile app
- Install Appium server dependencies
- Save snapshots of the device states
- Connect the devices with ADB
- Start the Appium server
- Run the client interactions script
iOS is a Similar Process
This article is focused on Android devices, but a similar process can be used to control iOS devices with Appium running on a Linux VM.
The main differences are the need to mount the developer disk image, the Appium runner app for iOS, and the XCUITest driver to interact with iOS devices instead of the UiAutomator2 driver for Android. You’ll also set the appium:udid capability to the iOS device’s UDID as appropriate in Appium Inspector and client scripts.
Please see our prior Appium blog post for more details.
Prerequisites
You’ll need access to a Corellium project with sufficient CPU cores to run both Linux and Android VMs. You should be familiar with Corellium interface and basic features, including how to install apps and connect over ADB or SSH.
We will be installing the Android SDK, Appium server, Appium client, Appium Inspector and any upstream dependencies. We will also be using Python scripts for automating app interactions to run the Appium client interactions, so familiarity with Python is helpful but not required.
Prepare the Android device
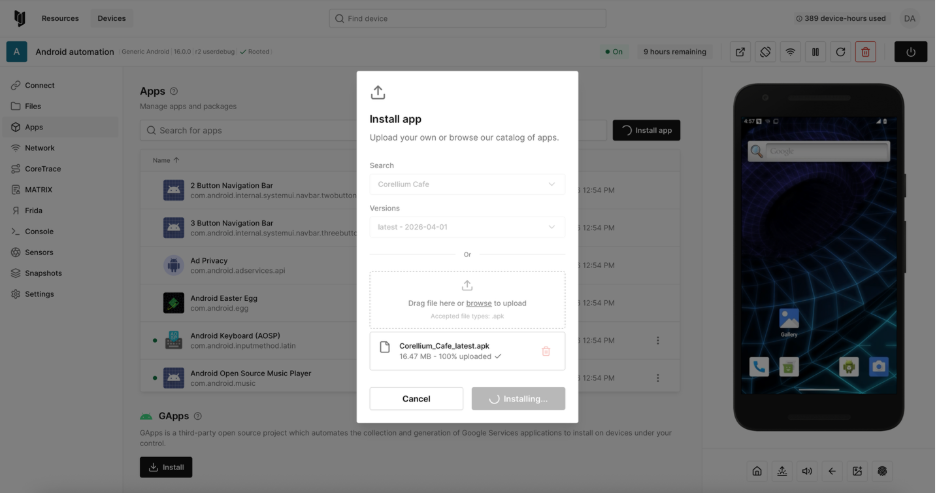
First, we will need to install Corellium Cafe on the mobile device.
- Create a new rooted Android 16 virtual device.
- Open the Apps tab, click Install app, select Corellium Cafe, then click Install.
Prepare the Appium Linux Server
- Create a new Generic Linux (UI) virtual device running Ubuntu.
- Log in using the default user/password credentials.
- On the Console tab, install the Android SDK, Curl, NPM, NVM, and Python client package. You can also run these commands from Terminal on the display or from your local environment over SSH (be sure to sudo apt install openssh-server first).
sudo apt update
sudo apt install -y android-sdk curl npm python3-pip python3-venv
curl -o- https://raw.githubusercontent.com/nvm-sh/nvm/v0.40.4/install.sh | bash
python3 -m venv myenv
source myenv/bin/activate
pip3 install Appium-Python-Client - If you’re working out of the Console tab, it will be helpful to clear the screen.
clear - Complete the Android and NVM installations. Add the following to ~/.bashrc then re-source the file.
cat << EOF >> "${HOME}/.bashrc"
export ANDROID_HOME='/usr/lib/android-sdk'
export NVM_DIR="$HOME/.nvm"
[ -s "$NVM_DIR/nvm.sh" ] && \. "$NVM_DIR/nvm.sh"
EOF
source "${HOME}/.bashrc" - Install the latest Node.js LTS and the Appium server package.
nvm install node
sudo npm install -g appium
appium driver install uiautomator2 - Download the Corellium Cafe Appium script to your virtual Linux device.
wget https://raw.githubusercontent.com/davidcbacker/automatecorellium/fe034083573bf50d5ff91bc5b7afc739a5bb2b64/src/util/appium_interactions_cafe_android.pyCreate Snapshots of Both Devices
Before continuing, let’s capture the states of both configured devices. These snapshots will allow us to save time running this test again in the future.
- Turn off the devices.
- Open the Snapshots tab and click Take Snapshot.
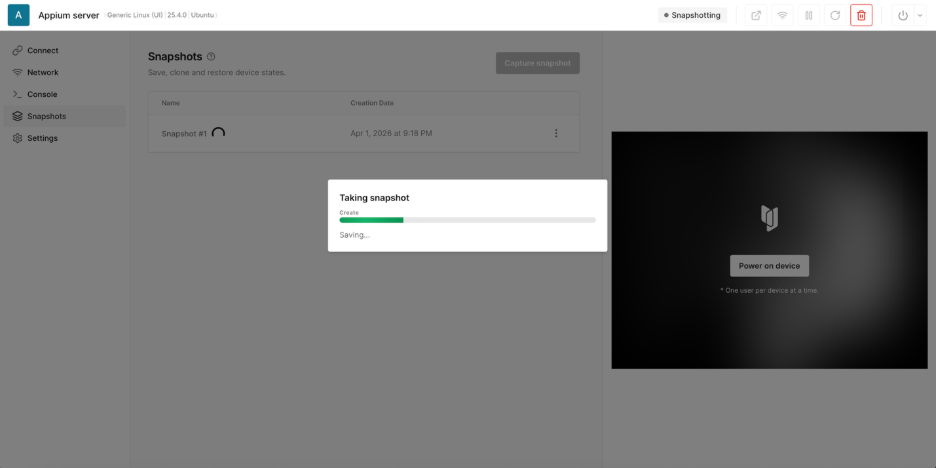
- Turn the devices back on and wait for them to boot.
Connect Your Android and Linux Devices
- Copy the ADB command from your Android device’s Connect tab.
- Run the ADB command on your Linux device. You should then see the Android’s IP address show up as attached.
adb connect 10.11.1.1:5001
adb devices -l 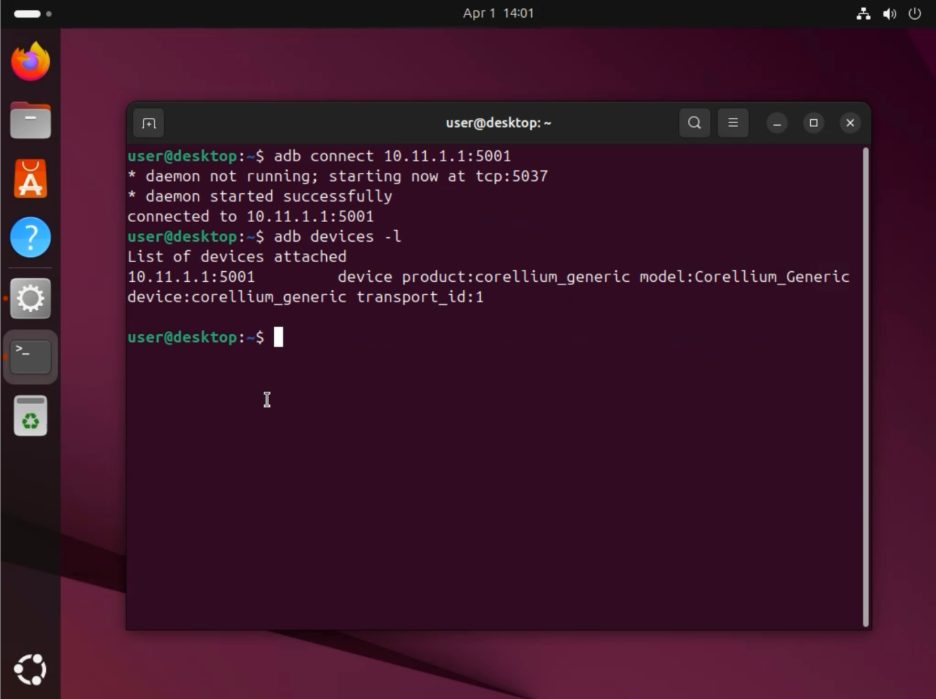
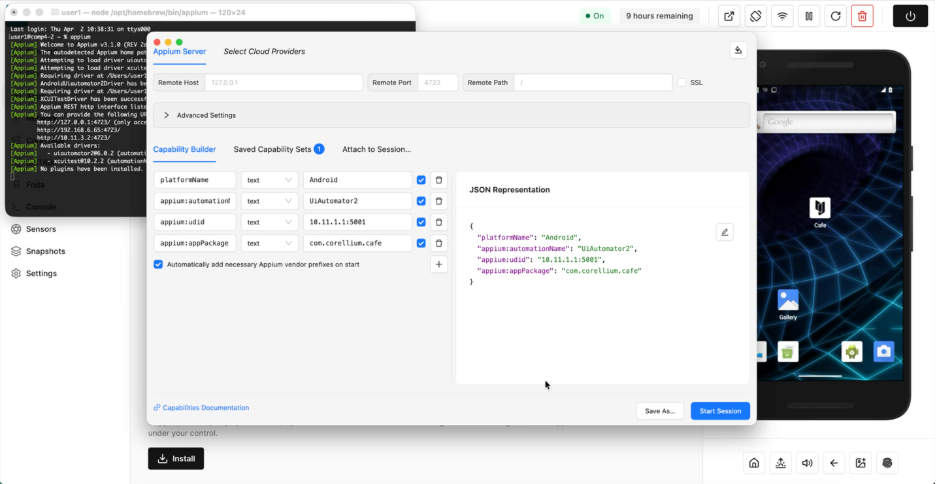
Start the Appium Server and Run the Interactions Script
- On the device display, open a new Terminal and start the Appium server. Towards the bottom, you should see that the UiAutomator2 driver has been loaded.
appium & 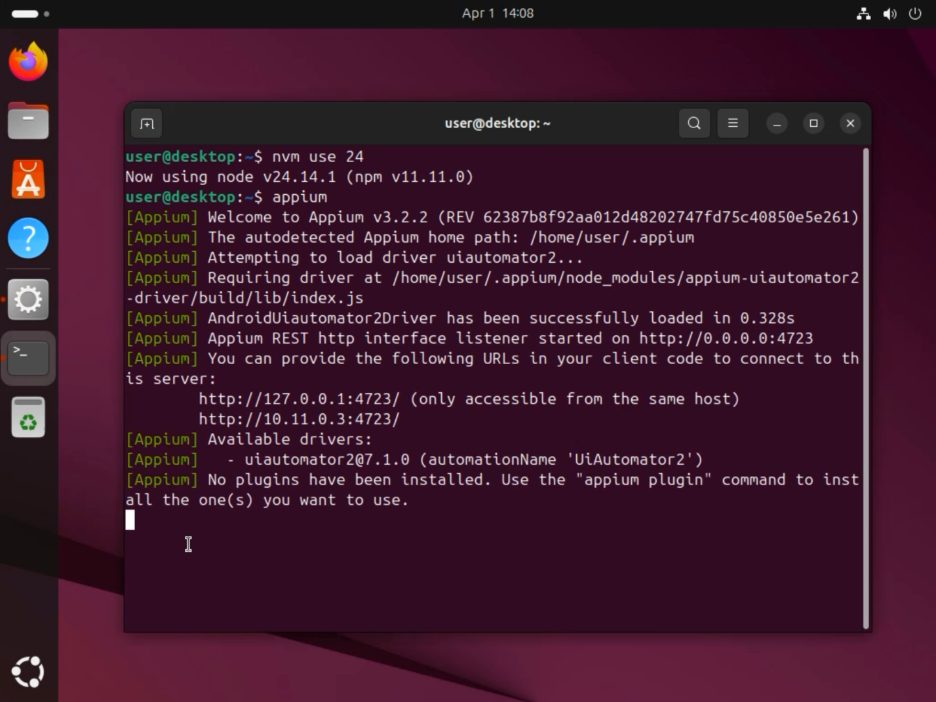
- Open a new Terminal window and start the Corellium Cafe Appium Python script. Be sure to load the venv you created earlier and to pass in Services IP address from the adb connect command as an argument into the script. For example, if your Android device’s Services IP is 10.11.1.7, call the script with python3 appium_interactions_cafe_android.py 10.11.1.7. Appium will install a support app then launch Corellium Cafe. When the Cafe app launches, the Appium driver will perform the predefined interactions.
source myenv/bin/activate
python3 appium_interactions_cafe_android.py 10.11.1.1 
3. The script will then close the webdriver, ending the Appium session.
Generate Your Own Appium Scripts
Now that you have Appium running with the Corellium Cafe example script, you can set up your own scripts based on interactions you record.
Appium Inspector
Appium Inspector is a GUI tool includes a helpful recorder that generates code snippets for the interactions you perform in the Inspector. These code snippets include the selectors for the elements you interact with, which is essential for automating your tests.
You can then copy-paste these snippets into your Appium script and modify them as needed.
Configure Your Environment Including Appium Inspector
For the purposes of recording the interactions, I will run Appium server and Appium Inspector on my local machine, connected to the Android device with ADB over the Corellium project VPN.
- Create a virtual Android device and install your target application.
- On your local environment, install the Android SDK, Appium server, Appium Inspector, and dependencies. For my example on macOS, I used Homebrew.
brew install appium
- Connect to the Corellium project VPN and run the ADB connect command. Be sure to replace the 10.11.1.x IP with your Corellium device’s Services IP. For my example, the VPN tunnel IP is 10.11.3.2 and the Android’s Services IP is 10.11.1.1.
ping 10.11.3.2
ping 10.11.1.1
adb connect 10.11.1.1:5001 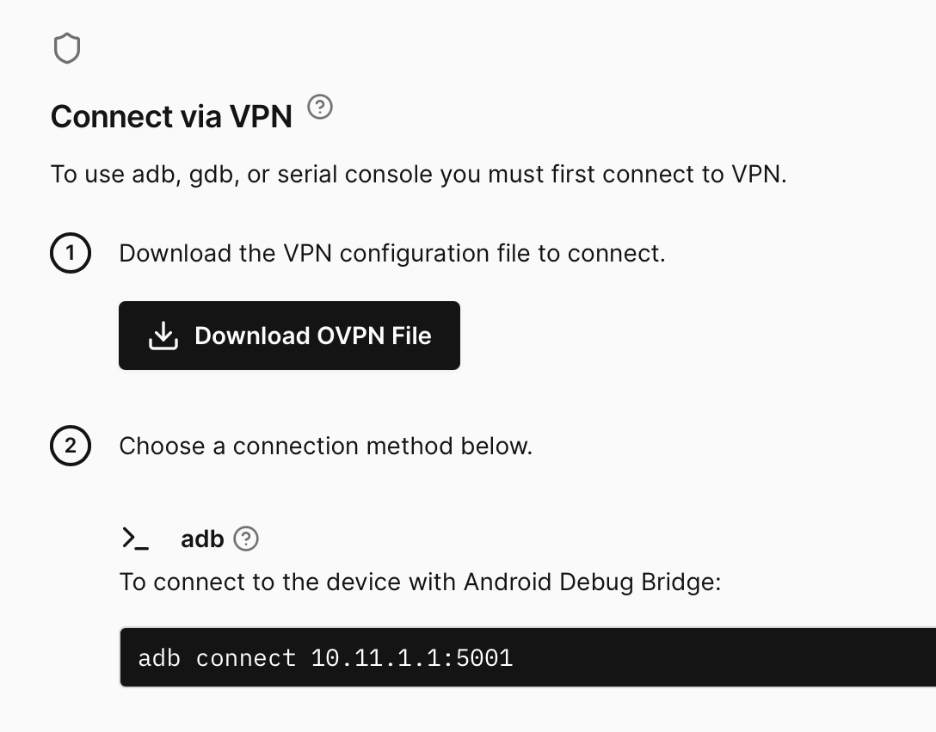
- Run the Appium server in Terminal on your local machine.
appium - Open Appium Inspector, leave the default Remote Host as 127.0.0.1 and Remote Port as 4723.
- Copy-paste the following capabilities into the JSON Representation field. You’ll need to click the Edit Raw JSON button, paste the data, then click the Save button. After saving, you should see the capabilities populate in the Capability Builder section.
{
  "platformName": "Android",
  "appium:automationName": "UiAutomator2",
  "appium:udid": "10.11.1.4:5001",
  "appium:appPackage": "com.corellium.cafe"
} 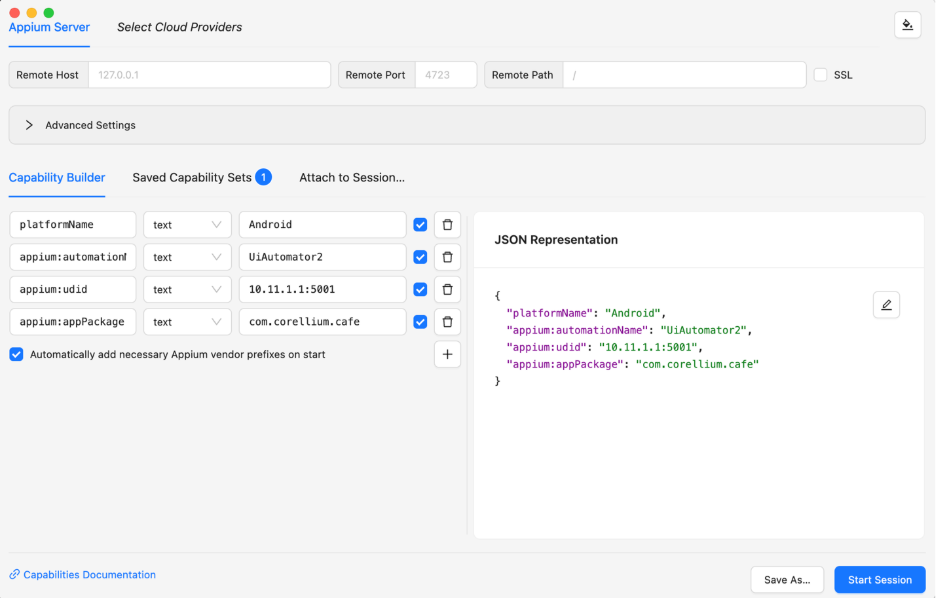
- Adjust the IP address in appium:udid value to match your Android device’s Services IP. For iOS, use the device’s UDID instead.
- Also set appium:appPackage to your target app’s package name. You can find these values in the Connect and Apps tabs, respectively.
Record Custom Interactions with Appium Inspector
- Click Start Session. Appium will take some time to open the session, install the Appium support app on your device, then launch your target application.
- On the left side of Appium Inspector, you should see a representation of your Android device’s display. If you hover over an element, you should see a yellow box highlight the element. If you click on an element, you will see its properties and available actions.
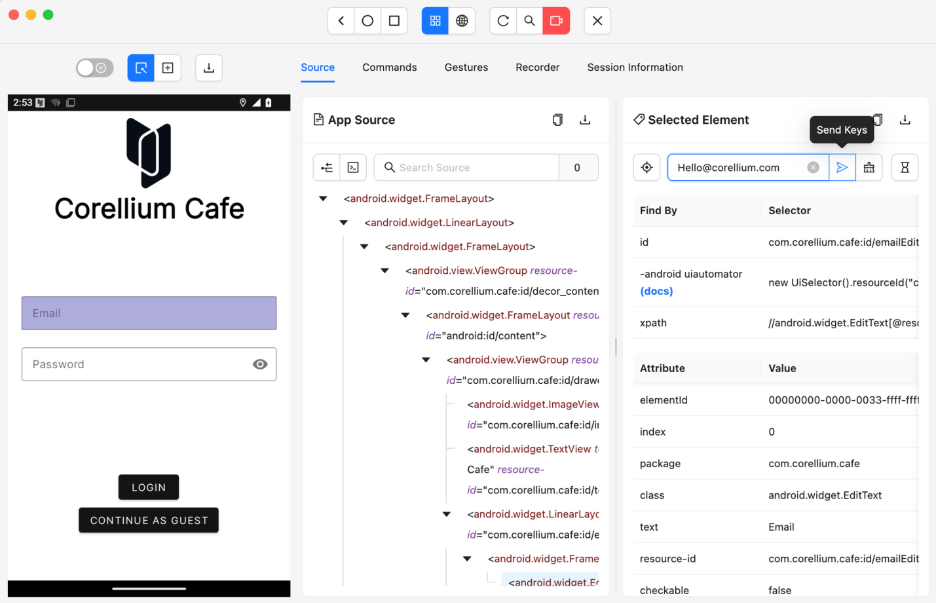
3. Click on the Start Recording button along the top menu. Then perform some interactions with the elements, including Tap and Send Keys. Navigate through the app and interact with different elements to generate recorded interactions.
4. When you are finished interacting, click Stop Recording then open the Recorder tab. You should see the generated code snippets for the interactions you performed. Choose your preferred programming language from the dropdown, such as Python, then copy the generated code snippets to use in your Appium script.
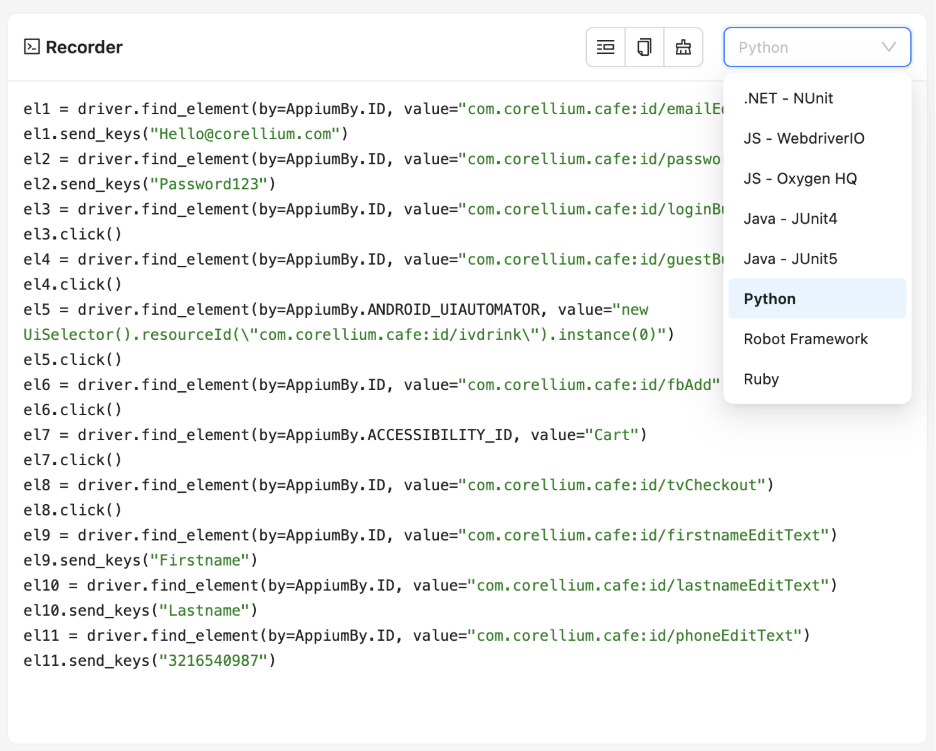
Use the Recorded Interactions in a Python Script
You can now use the generated code snippet in your own Appium script. For Python, the Appium client package is Appium-Python-Client.
For convenience, I wrote a Python template script that includes the necessary Appium session setup and teardown, as well as a placeholder to paste the generated code snippet from Appium Inspector.
- Install the Appium client for Python. Depending on your environment, you may want to do this as a venv.
pip3 install Appium-Python-Client
- Download the Python template script to your local environment.
wget https://raw.githubusercontent.com/davidcbacker/automatecorellium/fe034083573bf50d5ff91bc5b7afc739a5bb2b64/src/util/appium_interactions_template.py - Open the template script in a code editor and paste the generated code snippet from Appium Inspector into the placeholder section. You’ll need to adjust the indentation of the pasted code to conform to Python’s indentation rules.
def interact_with_app(driver: webdriver.Remote, driver_wait: WebDriverWait):
'''Interact with the target app using Appium commands.'''

  # ==== COPY-PASTE THE EXACT APPIUM INSPECTOR RECORDING SEQUENCE ====

  el1 = driver.find_element(by=AppiumBy.ID, value="com.corellium.cafe:id/emailEditText")
  el1.send_keys("Hello@corellium.com")
  el2 = driver.find_element(by=AppiumBy.ID, value="com.corellium.cafe:id/passwordEditText")
  el2.send_keys("Password123")
  el3 = driver.find_element(by=AppiumBy.ID, value="com.corellium.cafe:id/loginButton")
  el3.click()

# ==== END OF COPY-PASTE SECTION ==== - Set the TARGET_APP_PACKAGE variable to your target app’s package name. You can find this value in the Apps tab on the Corellium web interface.
TARGET_APP_PACKAGE = "com.corellium.cafe" - Save the script and run it. The script will launch the target app, perform the interactions you recorded, then close the session.
python3 appium_interactions_template.py 10.11.1.1 6. Modify your script for your specific use case. You can refer to techniques I used in the Corellium Cafe example script, such as how to take a screenshot, wait until a page loads, send a value then wait until the element updates before continuing, and handle runtime exceptions.
Build repeatable Appium workflows inside Corellium
Running Appium from a Corellium Linux VM gives teams a cleaner way to automate mobile app interactions without depending on a local machine, VPN tunnel, or external compute environment.
By keeping the Appium server, automation script, and Android virtual device inside the same Corellium project network, teams can simplify setup, reduce connectivity issues, and reuse configured environments across demos, testing, training, and proof-of-concept workflows.
This does not need to replace every Appium workflow. It gives teams a practical option when the blocker is not writing the test, but getting the environment ready, connected, and repeatable.
Start building repeatable Appium workflows in Corellium. Launch a Corellium Linux VM, connect it to your Android virtual device, and run your Appium server and scripts from the same project network.
Frequently Asked Questions (FAQ)
Who is this workflow for?
This workflow is for teams that want a cleaner way to run Android Appium automation against Corellium virtual devices. It is especially useful for developers, QA teams, security researchers, and solution engineers who need repeatable mobile app interaction without rebuilding local tooling every time.
What is the main benefit?
The main benefit is simplicity. By running the Appium server and automation script inside the same Corellium project as the Android device, teams can reduce dependency on local workstation setup, VPN routing, and external compute resources.
Does this replace existing Appium test infrastructure?
Not always. If your current Appium environment is reliable, integrated with CI, and already connected to Corellium devices, you may not need to change it. This approach is most valuable when environment setup or network access is slowing the team down.
Why use a Corellium Linux VM instead of a local machine?
A local machine can work well, but it often depends on the user’s installed SDKs, packages, permissions, VPN access, and system configuration. A Corellium Linux VM provides a project-local environment that can be configured once, snapshotted, and reused.
Is this only for testing?
No. Appium is often used for QA and regression testing, but the same workflow can support demos, proof-of-concept automation, training, repeatable research tasks, and scripted app interaction during mobile security analysis.